OBS Studio 30.2: The Ultimate Free Tool for Live Streaming and Recording
What Is OBS Studio?
OBS Studio (Open Broadcaster Software) is the gold standard for free, open-source live streaming and screen recording. It runs on Linux, Windows, and macOS, and I’ve been using it on my Debian 13 setup with XFCE as the desktop environment. Version 30.2 brings a polished Qt6 interface, WebSocket 5.5 for remote control, and rock-solid performance.
If you’ve ever wanted to record a tutorial, stream a game, or capture video from a webcam without paying for expensive software, OBS is where you start — and honestly, where you’ll probably stay.
Installation on Debian 13
One of the things I love about Debian is that OBS is right there in the repos. No PPAs, no AppImages, no flatpak fuss:
sudo apt update
sudo apt install obs-studio
That’s it. You get OBS 30.2 compiled with Qt6, PulseAudio support, and all the core plugins (x264 encoder, FFmpeg output, audio filters, text sources, etc.). The package is around 30MB and pulls in everything you need.
I’m running this on a virtual machine with XFCE 4.20 as the desktop and software rendering via Mesa llvmpipe (no dedicated GPU), and OBS still runs smoothly at 30fps 1080p for screen recording.
The Interface
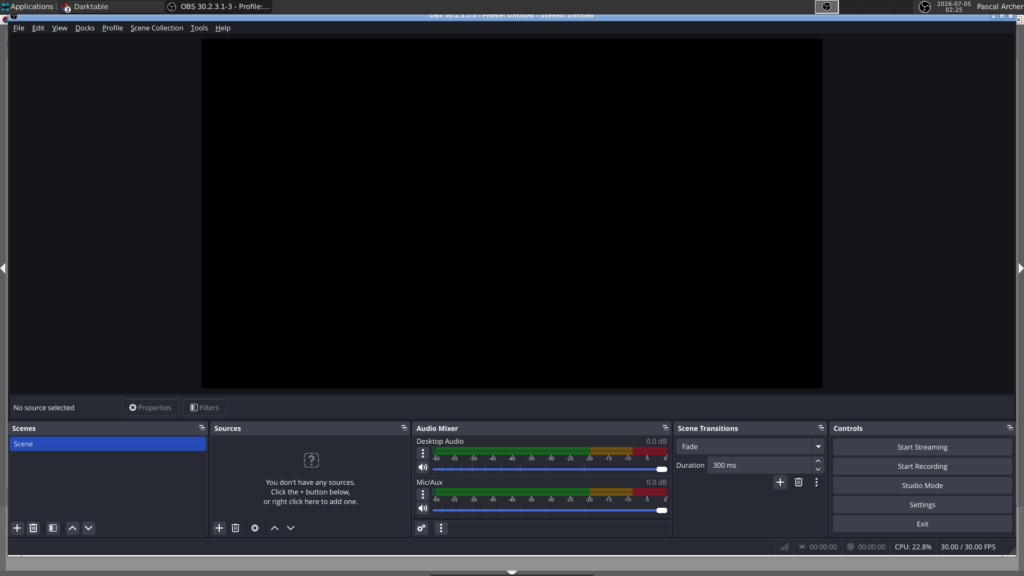
The first thing you notice is how clean the layout is. OBS organises everything into dockable panels that you can rearrange to suit your workflow:
- Preview area — the large canvas where you see exactly what your output looks like. No guesswork.
- Scenes — switch between different setups (e.g. “Gaming”, “Tutorial”, “Webcam only”). Each scene can have its own layout of sources.
- Sources — the building blocks. Screen capture, webcam, images, text, browser windows, game capture, even colour backgrounds.
- Audio Mixer — per-source volume control with live level meters. Desktop audio and microphone inputs are added by default.
- Controls — Start Streaming, Start Recording, Studio Mode (preview before going live), and Settings.
The status bar at the bottom shows your CPU usage, frame rate, and recording duration — essential info when you’re tuning performance.
Scene Composition
Each scene is a container where you layer sources. You can have your screen capture as the background, a webcam feed in the corner, an overlay image with your logo, and a text source showing the current date or a title — all composited together. OBS handles this in real-time with minimal overhead.
Studio Mode
Studio Mode lets you edit your next scene in a separate preview while your current scene is still live. When everything looks right, you push “Transition” and the audience sees the switch seamlessly. No fumbling, no accidental broadcasts of your desktop wallpaper.
Filters and Effects
Every source can have filters applied: colour correction, chroma key (green screen), noise suppression, compression, gain, and more. The audio filters are particularly good — the noise suppression filter (RNNoise) can clean up a cheap microphone remarkably well.
WebSocket Remote Control
OBS 30.2 comes with a built-in WebSocket server (port 4455 by default). You can control OBS from another application, a phone app, or a custom script. I use this to start/stop recordings from automation scripts without touching the GUI.
Encoder Choice
OBS supports multiple encoders: x264 (software, best compatibility), SVT-AV1 (modern, efficient), and if you have a GPU, hardware encoders like NVENC (Nvidia), VAAPI (AMD/Intel), or Apple VideoToolbox. On my VM with software rendering, x264 at “veryfast” preset gives solid 1080p30 recordings with about 20-25% CPU usage on a 2-core VM.
Setting Up Your First Scene
When you first open OBS, you’ll see an empty scene with no sources. Click the “+” button in the Sources panel and add a “Screen Capture (PipeWire)” source (or “X11 Screen Capture” on older setups). Select your display, and you should see your desktop appear in the preview. Add another source — a text overlay with your channel name or recording title — and position it wherever you like using the transform tools. Click “Start Recording”, do something on your desktop for 10 seconds, then stop. OBS will save an MP4 file to your Videos folder by default.
Performance Notes
I tested OBS on a Debian 13 VM with 4GB RAM and 2 virtual CPU cores (Intel i7-8700 host). The VM uses software rendering (Mesa llvmpipe with OpenGL 4.5), no dedicated GPU passthrough:
- Screen recording (1080p, 30fps, x264 veryfast): ~20-25% CPU usage. Smooth, no dropped frames.
- Idle OBS with no recording: ~8-12% CPU (the preview renderer is always active).
- With audio processing: an extra 2-3% CPU.
These are perfectly usable numbers. If you have hardware encoding (NVENC, VAAPI) the CPU load drops to near zero. OBS is very well optimised.
The Bottom Line
In a world where proprietary streaming software can cost $15-40/month or lock features behind subscriptions, OBS sits there as a completely free, open-source, cross-platform solution that matches or beats commercial alternatives. It powers everything from casual YouTube tutorials to professional esports streams. The fact that it’s community-built and transparent about what it does with your data makes it an easy choice for anyone who values their privacy.
Download it at obsproject.com — free, no subscriptions, no account required.
Looking for more recording and streaming tools? Browse our Creative & Multimedia directory for more free software.